
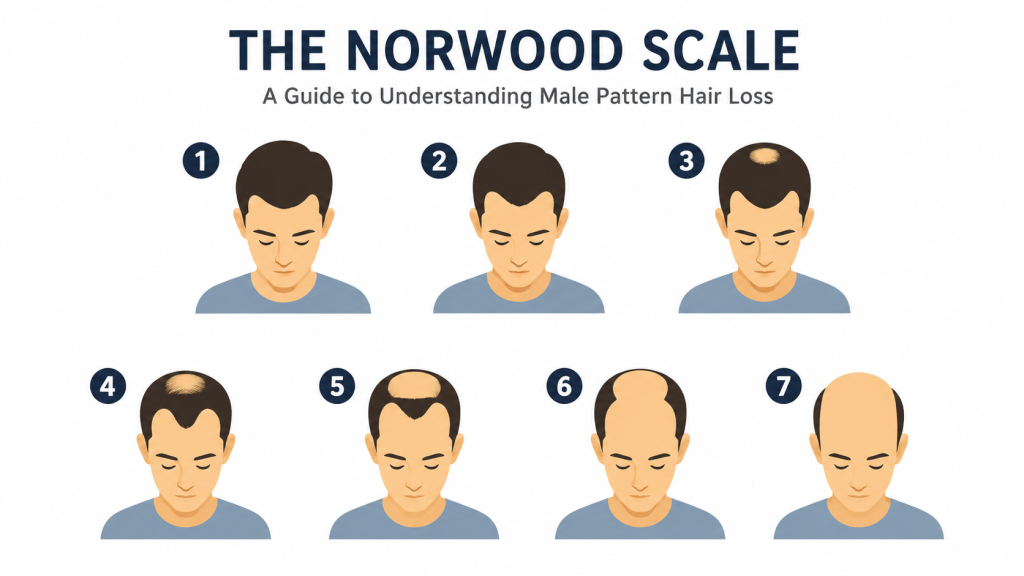
Your Norwood stage shapes every decision in your SMP density treatment
You know you’re thinning, but you’re not sure how far along you are or what that means for treatment. That’s exactly what this piece answers. SMP density for male pattern baldness is matched specifically to your Norwood stage, with technique, dot placement, and coverage all shifting as hair loss progresses. By the end, you’ll know what to expect at every level.
Why your Norwood stage is the starting point for any SMP density plan
Male pattern baldness follows a broadly predictable path, and the Norwood scale maps it across seven stages. Stage 1 is a full head of hair with no visible recession. Stage 7 is extensive loss across the top and crown, with only a horseshoe of hair remaining at the sides. Most men seeking a density treatment sit somewhere between stage 2 and stage 5, which is where SMP does its most effective work.
Your stage dictates almost every technical decision: how many passes are needed, how densely the pigment dots are placed, how much contrast is being worked with, and which areas need the most attention. There’s no single universal approach. A stage 2 client and a stage 5 client are receiving meaningfully different treatments, even though both fall under the same male density SMP umbrella.
For men who want to keep their existing hair rather than shave down, density SMP works by adding the visual impression of thickness between existing follicles. It’s sometimes called a hair tattoo in casual conversation, but the technique is far more precise than that term suggests.
Stages 2 and 3: subtle density where the hairline and temples are thinning
At stage 2, recession at the temples has begun but overall density on top is still reasonable. Stage 3 brings more pronounced recession, often with early crown thinning starting to show. These are stages where you’re probably the only one who notices every morning, but it bothers you more than it should.
For these earlier stages, the SMP work is delicate and precise. Pigment dots are placed at a lower density to blend seamlessly with existing hair, with the focus on the temples and frontal hairline rather than the crown. The goal isn’t dramatic transformation; it’s restoring the visual weight of hair so the thinning simply stops being visible. Matching dot size and colour to your existing hair is critical here, because any inconsistency stands out far more when there’s still plenty of real hair around it.
One session is sometimes sufficient at these stages, though two are more typical, allowing density to be built gradually and adjustments made once the pigment has settled. Results at stages 2 and 3 tend to look very natural because the existing hair does much of the blending work.
Stage 4: balancing density across a larger thinning zone
Stage 4 is where hair loss becomes more visually obvious. The crown is clearly thinning, and the bridge of hair between the temples and the vertex is narrowing. This is the stage where many men start actively researching their options rather than quietly hoping it’ll stop.
The SMP density challenge at stage 4 is coverage consistency. You’re working across a larger surface area where the thinning isn’t uniform, so pigment placement needs to account for areas of almost complete loss alongside areas where hair is still present but sparse. Dot density increases in the more exposed zones, but it still needs to grade softly into areas with more hair so there’s no visible boundary between treated and untreated skin.
Typically three sessions are needed at stage 4, giving the practitioner the ability to build coverage in layers and correct tone and density as the pigment settles. The hair loss stage density treatment at this level is genuinely transformative. Most clients report a significant reduction in the visual contrast between their hairline and the thinning crown.
Stage 5: managing high contrast and larger areas of exposure
By stage 5, the areas of significant hair loss are large, and the contrast between the thinning scalp and the denser sides is striking. This is the stage where density SMP demands the most from both the practitioner and the process.
The approach here requires careful attention to tonal consistency across the whole scalp. Pigment used in more exposed areas needs to match the colour and visual weight of the remaining hair at the sides, which becomes more complex because different parts of the scalp hold pigment slightly differently. Oilier zones, previous sun exposure, and skin texture all play a role.
Three sessions are standard at stage 5, and in some cases a fourth is warranted to refine specific zones. Density isn’t pushed to look artificially thick, because the aim is always a natural impression of coverage rather than a solid block of colour. When it’s done well, male pattern baldness at this stage becomes dramatically less visible without the hair looking implausible.
A note on numbing cream: it’s not something I use as standard, but if you’d prefer to apply it yourself beforehand, that’s absolutely fine. Most clients at every stage manage comfortably without it, but it’s always your call.
Frequently Asked Questions
Can SMP density work if I don’t want to shave my head?
Yes. Male density SMP is specifically designed for men who want to keep their existing hair. The pigment is placed between your real follicles to add visual thickness, so there’s no need to shave down. It works across all Norwood stages from 2 to 5, blending with whatever hair you still have.
How many sessions will I need for my Norwood stage?
It depends on your stage. Stages 2 and 3 typically need two sessions. Stage 4 and above usually require three, sometimes four. Sessions are spaced to allow the pigment to settle between visits, which means the final result is built gradually and can be adjusted for tone and density as you go.
Will the SMP density treatment match my existing hair colour?
Matching your natural hair colour is one of the most important parts of the process. The pigment is customised per client, taking into account your hair shade, skin tone, and the degree of grey in your hair. At earlier Norwood stages especially, a precise colour match is essential because the real hair provides a direct reference point across the scalp.
Does SMP density look natural on a stage 5 hair loss pattern?
It absolutely can. The key is not pushing the density to look artificially thick across large areas of exposed scalp. A skilled practitioner builds coverage gradually across sessions, matches the tonal weight to your remaining hair, and accounts for how different scalp zones hold pigment. The result reads as natural thickness, not a drawn-on effect.
Is the SMP process painful for male density treatments?
Most men find it manageable without any numbing cream, describing the sensation as mild to moderate discomfort rather than pain. If you’d prefer to apply numbing cream yourself before the session, that’s entirely fine. Sensitivity varies between individuals and between scalp zones, but it’s rarely something clients find difficult to get through.